Model Collector Magazine - How to Make Waterslide Decals Article
🚍 DECORATE WITH WATERSLIDE DECALS
📰 As featured in Model Collector Magazine
Model enthusiast Simon Elmore reveals a creative and inexpensive way to produce your own decals for die-cast vehicle restoration. Once used in nearly all classic die-cast production, waterslide decals bring authenticity to any restoration—and now you can make them at home.
🛠️ Getting Started: A Blank Canvas
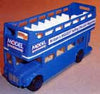
Simon began with an old Corgi open-top Routemaster bus discovered in his father's collection—completely missing its decals. This made it the perfect blank canvas for a personalized makeover using white waterslide decal paper from mcgpaper.com. Waterslide paper comes in two varieties: clear and white. Clear decal paper shows the base color underneath, while white paper keeps unprinted areas opaque—ideal for designs that include white or light-colored backgrounds.
📐 Step 1: Design & Sizing
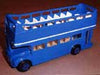
Using a graphic design program, Simon recreated the Model Collector logo and added a side banner: "Britain's BIGGEST Selling Diecast Magazine!" After printing test sheets on plain paper, he matched the sizing to the bus and printed the final version on white waterslide decal paper using best print quality settings.
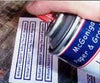
🖨️ Step 2: Spraying & Sealing
After printing, a thin layer of acrylic fixative spray was applied over the decals to seal the ink. Using short bursts, Simon held the can 8 inches from the sheet and swept side to side. Proper ventilation is essential. The decals were left to dry at room temperature for 10+ hours.
✂️ Step 3: Cutting with Precision
Once dry, decals were trimmed using a sharp hobby knife and ruler. Simon recommends avoiding visible borders around each design to prevent white bleeding into the colored area. Straight, clean cuts help the decals blend seamlessly with the model’s surface.

💧 Step 4: Soak & Slide
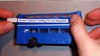
The decals were soaked in lukewarm water for 15–20 seconds using tweezers. Once the film separated from the backing, each piece was transferred to the model using a soft, damp paintbrush. The moisture allows repositioning before final placement.
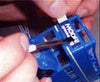
🖌️ Step 5: Application & Setting
With the decal positioned, Simon gently dabbed it with tissue to absorb excess moisture. After a short wait, he brushed on a thin layer of Decal Coat—a finishing solution that helps lock the decal in place, eliminates unwanted shine, and reduces edge visibility.
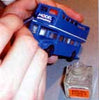
🚌 Step 6: Final Touches
Additional logos were applied to the back and sides of the bus. Each was sealed with a matching layer of Decal Coat, brushed about 1mm past the decal edge to create a seamless finish. This technique allows you to fully personalize any model while keeping a professional appearance.
📦 Supplies Used
- ✨ Clear Waterslide Decal Paper – Inkjet
- ✨ White Waterslide Decal Paper – Inkjet
- 🛠️ Acrylic Fixative Spray (clear)
- 🛠️ Sharp hobby knife + tweezers
- 🛠️ Optional: Decal Coat finish